Quantcast
Channel: React – SitePoint
Viewing all 115 articles
Browse latest View live

Redux vs MobX: Which Is Best for Your Project?

$
0
0

For a lot of JavaScript developers, the biggest complaint with Redux is the amount of boilerplate code needed to implement features. A better alternative is MobX which provides similar functionality but with lesser code to write.

For MobX newbies, take a quick look at this introduction written by MobX's creator. You can also work through this tutorial to gain some practical experience.

The goal of this article is to help JavaScript developers decide which of these two state management solutions are best for their projects. I've migrated this CRUD Redux project to MobX to use as an example in this article. I'll first discuss the pros and cons of using MobX then I'll demonstrate actual code samples from both versions to show the difference.

The code for the projects mentioned in this article can be found on GitHub:

  • https://github.com/sitepoint-editors/redux-crud-example
  • https://github.com/sitepoint-editors/mobx-crud-example

What do Redux and MobX have in Common?

First, let's look at what they both have in common. They:

  • Are open-source libraries
  • Provide client-side state management
  • Support time-travel debugging via redux-devtools-extension
  • Are not tied to a specific framework
  • Have extensive support for React/React Native frameworks

4 Reasons to use MobX

Let's now look at the main differences between Redux and MobX.

1. Easy to learn and use

For a beginner, you can learn how to use MobX in just 30 minutes. Once you learn the basics, that's it. You don't need to learn anything new. With Redux the basics are easy too. However, once you start building more complex applications you will have to deal with:

  • Handling async actions with redux-thunk
  • Simplifying your code with redux-saga
  • Define selectors to handle computed values etc.

With MobX, all these situations are "magically" taken care of. You don't need additional libraries to handle such situations.

2. Less code to write

To implement a feature in Redux, you need to update at least four artifacts. This includes writing code for reducers, actions, containers and components. This is particularly annoying if you are working on a small project. MobX only requires you to update at least 2 artifacts (i.e. the store and the view component).

3. Full support for object-oriented programming

If you prefer writing object-oriented code, then you will be pleased to know you can use OOP to implement state management logic with MobX. Through the use of decorators such as @observable and @observer, you can easily make your plain JavaScript components and stores reactive. If you prefer functional programming, no problem; that is supported as well. Redux, on the other hand, is heavily geared towards functional programming principles. However, you can use the redux-connect-decorator library if you want a class based approach.

4. Dealing with nested data is easy

In most JavaScript applications, you'll find yourself working with relational or nested data. To be able to use it in a Redux store, you will have to normalize it first. Next, you have to write some more code to manage tracking of references in normalized data.

In MobX, it is recommended to store your data in a denormalized form. MobX can keep track of the relations for you and will automatically re-render changes. By using domain objects to store your data, you can refer directly to other domain objects defined in other stores. In addition, you can use (@)computed decorators and modifiers for observables to easily solve complex data challenges.

3 Reasons not to use MobX

1. Too much freedom

Redux is a framework that provides strict guidelines on how you write state code. This means you can easily write tests and develop maintainable code. MobX is a library and has no rules on how to implement it. The danger with this is that it's very easy to take shortcuts and apply quick fixes which can lead to unmaintainable code.

2. Hard to debug

MobX's internal code "magically" handles a lot of logic to make your application reactive. There's an invisible area where your data passes between the store and your component which makes it difficult to debug when you have a problem. If you change state directly in components, without using @actions, you will have a hard time pinpointing the source of a bug.

3. There could be a better alternative to MobX

In software development, new emerging trends appear all the time. Within a few short years, current software techniques can quickly loose momentum. At the moment, there are several solutions competing with both Redux and Mobx. A few examples are Relay/Apollo & GraphQL, Alt.js and Jumpsuit. Any of these technologies has the potential to become the most popular. If you really want to know which one is best for you, you'll have to try them all.

Continue reading %Redux vs MobX: Which Is Best for Your Project?%


Why Use React JS for Fast Interactive User Interfaces?

$
0
0

Why React for Fast Interactive User Interfaces

This article is part of a series created in partnership with SiteGround. Thank you for supporting the partners who make SitePoint possible.

Nowadays users expect sleek, performant web applications that behave more and more like native apps.

Techniques have been devised to decrease the waiting time when a website gets downloaded on a user's first visit. However, in web applications that expose a lot of interactivity, the time elapsing between a user action taking place and the app's response is also important. Native apps feel snappy, web apps are expected to behave the same, even on less than ideal internet connections.

A number of modern JavaScript frameworks have sprung up which can be very effective at tackling this problem. React JS can be safely considered among the most popular and robust JavaScript libraries you can use to create fast interactive user interfaces for web apps.

In this article I'm going to talk about what React JS is good at and what makes it work, which should provide you with some context to help you decide if this library could be a good fit for your next project.

What Is React JS?

React JS is a Facebook creation which simply labels itself as being a JavaScript library for building user interfaces.

It's an open source project which to date rakes in well over 67,000 stars on GitHub.

React JS is:

  • Declarative — which means that you only need to design simple views for each state in your application, and React will efficiently update and render just the right components when your data changes
  • Component-Based — you create your React-powered apps by assembling a number of encapsulated components, each managing its own state
  • Learn Once, Write Anywhere — React is not a full-blown framework, it's just a library for rendering views.

How Does the Virtual DOM Work?

The Virtual DOM is at the core of what makes React fast at rendering user interface elements and their changes. Let's look closer into its mechanism.

The HTML Document Object Model or DOM is a

...programming interface for HTML and XML documents. ... The DOM provides a representation of the document as a structured group of nodes and objects that have properties and methods. Essentially, it connects web pages to scripts or programming languages.

MDN

Whenever you want to change any part of a web page programmatically, you need to modify the DOM. Depending on the complexity and size of the document, traversing the DOM and updating it could take longer than users might be prepared to accept, especially if you take into account the work browsers need to do when something in the DOM changes. In fact, every time the DOM gets updated, browsers need to recalculate the CSS and carry out layout and repaint operations on the web page.

React JS makes possible for developers to make changes to the web page without having to deal directly with the DOM. This is done via the Virtual DOM.

The Virtual DOM is a lightweight, abstract model of the DOM. React uses the render() method to create a node tree from React components and updates this tree in response to changes in the data model resulting from actions.

Each time there are changes to the underlying data in a React app, React creates a new Virtual DOM representation of the user interface.

Updating UI Changes With the Virtual DOM

When it comes to updating the browser’s DOM, React roughly follows the steps below:

  • Whenever something changes, React re-renders the entire UI in a Virtual DOM representation
  • React then calculates the difference between the previous Virtual DOM representation and the new one
  • Finally, React patches up the real DOM with what has actually changed. If nothing has changed, React won't be dealing with the HTML DOM at all.

One would think that such a process, which involves keeping two representations of the Virtual DOM in memory and comparing them, could be slower than dealing directly with the actual DOM. This is where efficient diff algorithms, batching DOM read/write operations, and limiting DOM changes to the bare minimum necessary, make using React JS and its Virtual DOM a great choice for building performant apps.

Is React Good for Every Project?

Continue reading %Why Use React JS for Fast Interactive User Interfaces?%

How I Designed & Built a Fullstack JavaScript Trello Clone

$
0
0

A few weeks ago, I came across a developer sharing one of his side projects on GitHub: a Trello clone. Built with React, Redux, Express, and MongoDB, the project seemed to have plenty of scope for working on fullstack JS skills.

I asked the developer, Moustapha Diouf, if he'd be interested in writing about his process for choosing, designing, and building the project and happily, he agreed. I hope you'll find it as interesting as I did, and that it inspires you to work on ambitious projects of your own!

Nilson Jacques, Editor


In this article, I'll walk you through the approach I take, combined with a couple of guidelines that I use to build web applications. The beauty of these techniques is that they can be applied to any programming language. I personally use them at work on a Java/JavaScript stack and it has made me very productive.

Before moving on to the approach, I'll take some time to discuss how:

  • I defined my goals before starting the project.
  • I decided on the tech stack to use.
  • I setup the app.

Keep in mind that since the entire project is on GitHub (madClones), I'll focus on design and architecture rather than actual code. You can check out a live demo of the current code: you can log in with the credentials Test/Test.

Screenshot of fullstack Trello clone

If you're interested in taking your JavaScript skills to the next level, sign up for SitePoint Premium and check out our latest book, Modern JavaScript

Defining the Goals

I started by taking a couple of hours a day to think about my goals and what I wanted to achieve by building an app. A to-do list was out of the question, because it was not complex enough. I wanted to dedicate myself to at least 4 months of serious work (it's been 8 months now). After a week of thinking, I came up with the idea to clone applications that I like to use on a daily basis. That is how the Trello clone became a side project.

In summary, I wanted to:

  • Build a full stack JavaScript application. Come out of my comfort zone and use a different server technology.
  • Increase my ability to architect, design, develop, deploy and maintain an application from scratch.
  • Practice TDD (test driven development) and BDD (behavior driven development). TDD is a software practice that requires the developer to write test, watch them fail, then write the minimum code to make the test pass and refactor (red, green, refactor). BDD, on the other hand, puts an emphasis on developing with features and scenario. Its main goal is to be closer to the business and write a language they can easily understand.
  • Learn the latest and the hottest frameworks. At my job, I use angular 1.4 and node 0.10.32 (which is very sad I know) so I needed to be close to the hot stuff.
  • Write code that follows the principle of the 3R's: readability, refactorability, and reusability.
  • Have fun. This is the most important one. I wanted to have fun and experiment a lot since I was (and still am) the one in charge of the project.

Choosing the Stack

I wanted to build a Node.js server with Express and use a Mongo database. Every view needed to be represented by a document so that one request could get all the necessary data. The main battle was for the front-end tech choice because I was hesitating a lot between Angular and React.

I am very picky when it comes to choosing a framework because only testability, debuggability and scalability really matter to me. Unfortunately, discovering if a framework is scalable only comes with practice and experience.

I started with two proof-of-concepts (POCs): one in Angular 2 and another one in React. Whether you consider one as a library and the other one as a framework doesn't matter, the end goal is the same: build an app. It's not a matter of what they are, but what they do. I had a huge preference for React, so I decided to move forward with it.

Getting Started

I start by creating a main folder for the app named TrelloClone. Then I create a server folder that will contain my Express app. For the React app, I bootstrap it with Create React App.

I use the structure below on the client and on the server so that I do not get lost between apps. Having folders with the same responsibility helps me get what I am looking for faster:

  • src: code to make the app work
  • src/config: everything related to configuration (database, URLs, application)
  • src/utils: utility modules that help me do specific tasks. A middleware for example
  • test: configuration that I only want when testing
  • src/static: contains images for example
  • index.js: entry point of the app

Setting up the Client

I use create-react-app since it automates a lot of configuration out of the box. "Everything is preconfigured and hidden so that you can focus on code", says the repo.

Here is how I structure the app:

  • A view/component is represented by a folder.
  • Components used to build that view live inside the component folder.
  • Routes define the different route options the user has when he/she is on the view.
  • Modules (ducks structure) are functionalities of my view and/or components.

Setting up the Server

Here is how I structure the app with a folder per domain represented by:

  • Routes based on the HTTP request
  • A validation middleware that tests request params
  • A controller that receives a request and returns a result at the end

If I have a lot of business logic, I will add a service file. I do not try to predict anything, I just adapt to my app's evolution.

Choosing Dependencies

When choosing dependencies I am only concerned by what I will gain by adding them: if it doesn't add much value, then I skip. Starting with a POC is usually safe because it helps you "fail fast".

If you work in an agile development you might know the process and you might also dislike it. The point here is that the faster you fail, the faster you iterate and the faster you produce something that works in a predictable way. It is a loop between feedback and failure until success.

Client

Here is a list of dependencies that I always install on any React app:

Continue reading %How I Designed & Built a Fullstack JavaScript Trello Clone%

Why I’m Switching from React to Cycle.js

$
0
0

I would guess that most developers these days are using some sort of framework for developing apps. Frameworks are there to help us structure complex apps and save us time. Every day, we can see much discussion about which framework is the best, which framework should you learn first, etc. So today, I would like to share my experience, and why I'm switching to Cycle.js from React.

React is probably the most popular frontend framework these days and it has a great community. I am a big fan of it and it really helped me to change the way I think about web apps and how I develop them. Some developers love it, and some think that it's not as good as everyone says.

Most people start to use React without thinking that there might be a better way to build a web app. That reflection made me try Cycle.js, a new reactive framework that is becoming more popular every day. In this article, I want to explain what reactive programming is, how Cycle.js works, and why I think it's better than React. So let's start!

What is Reactive Programming?

Reactive programming (RP) is programming with asynchronous data streams. If you've already built a web app, you probably did a lot of reactive programming. As an example, click events are asynchronous data streams. We can observe them and perform some side effects. The idea behind RP is to give us an ability to create data streams from anything and manipulate with them. We then have the same abstraction for all our side effects which is easier to use, maintain, and test.

You're probably thinking "why do I need this new reactive programming thing?" The answer is simple: Reactive programming will help you unify your code and make it more consistent. You won't need to think about how the things should work and how to properly implement them. Just write the code in the same way, no matter what data you work on (click events, HTTP calls, web sockets...). Everything is a stream of data and each stream has many functions that you can use to work with it, such as map, and filter. These function will return new streams that can be used, and so on.

Reactive programming gives you the bigger abstraction of your code. It will give you an ability to create interactive user experiences and focus on business logic.

reactive-clicks
Image taken from https://gist.github.com/staltz/868e7e9bc2a7b8c1f754

Reactive Programming in JavaScript

In JavaScript, we have a couple of awesome libraries for dealing with data streams. The most well-known one is RxJS. It's an extension of ReactiveX, an API for asynchronous programming with observable streams. You can create an Observable (a stream of data), and manipulate it with various functions.

The second one is Most.js. It has the best performance and they can prove that with some numbers: Performance comparation.

I would also like to mention one small and fast library, made by the creator of Cycle.js and made specifically for it. It's called xstream. It has only 26 methods, is approximately 30kb, and is one of the fastest libraries for reactive programming in JS.

In the examples below, I will use xstream library. Cycle.js is made to be a small framework and I want to attach the smallest reactive library to it.

What is Cycle.js?

Cycle.js is a functional and reactive JavaScript framework. It abstracts your application as a pure function, main(). In functional programming, functions should have only inputs and outputs, without any side effects. In Cycle.js's main() function, inputs are read effects (sources) from the external world and outputs (sinks) are write effects to the external world. Managing side effects is done using drivers. Drivers are plugins that handle DOM effects, HTTP effects, and web sockets etc.

Cycle.js
Image taken from Cycle.js website

Cycle.js is there to help us build our user interfaces, test them and write reusable code. Each component is just one pure function that can run independently.

The core API has just one function, run.

run(app, drivers);

It has two arguments, app and drivers. app is the main pure function and drivers are plugins that need to handle side effects.

Cycle.js separates additional functionality into smaller modules. They are:

Cycle.js Code

Let's see some Cycle.js code? We will create a simple app that should demonstrate how it works. I think that a good old counter app should be ideal for this example. We will see how handling DOM events and re-rendering the DOM works in Cycle.js.

Let's create two files, index.html and main.js. index.html will just serve our main.js file, where the whole of our logic will be. We are also going to create a new package.json file, so run:

npm init -y

Next, let's install our main dependencies:

Continue reading %Why I’m Switching from React to Cycle.js%

How to Create a Reddit Clone Using React and Firebase

$
0
0

React is an awesome JavaScript library for building user interfaces. Since the publishing of Create React App, it has become very easy to scaffold a barebones React application.

In this article, we will be using Firebase along with Create React App to build an app which will function similar to Reddit. It will allow the user to submit a new link which can then be voted on.

Here's a live demo of what we'll be building.

Why Firebase?

Using Firebase will make it very easy for us to show real-time data to the user. Once a user votes on a link, the feedback will be instantaneous. Firebase's Realtime Database will help us in developing this feature. Also, it will help us to understand how to bootstrap a React application with Firebase.

Why React?

React is particularly known for creating user interfaces using a component architecture. Each component can contain internal state or be passed data as props. State and props are the two most important concepts in React. These two things help us determine the state of our application at any point in time. If you are not familiar with these terms, please head over to the React docs first.

Note: You can also use a state container like Redux or MobX, but for the sake of simplicity, we won't be using one for this tutorial.

The whole project is available on Github.

Setting up the project

Let's walk through the steps to set up our project structure and any necessary dependencies.

Installing create-react-app

If you haven't already, you need to install create-react-app. To do so, you can type the following in your terminal:

npm install -g create-react-app

Once you've installed it globally, you can use it to scaffold a React project inside any folder.

Now, let's create a new app and call it reddit-clone.

create-react-app reddit-clone

This will scaffold a new create-react-app project inside the reddit-clone folder. Once the bootstrapping is done, we can go inside reddit-clone directory and fire up the development server:

npm start

At this point, you can go to http://localhost:3000/ and see your app skeleton up and running.

Structuring the app

For maintenance, I always like to separate my containers and components. Containers are the smart components which are contains the business logic of our application and manage Ajax requests. Components are simply dumb presentational components. They can have their own internal state which can be used to control the logic of that component (e.g. showing the current state of a controlled input component).

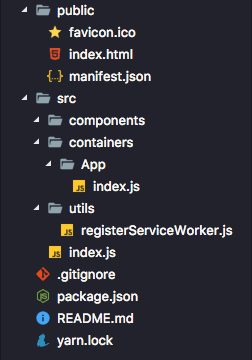
After removing the unnecessary logo and css files, this is how your app should look like now. We created a components folder and a containers folder. Let's move App.js inside the containers/App folder and create registerServiceWorker.js inside the utils folder.

Structuring the app

Your src/containers/App/index.js file should look like this:

// src/containers/App/index.js

import React, { Component } from 'react';

class App extends Component {
  render() {
    return (
      <div className="App">
        Hello World
      </div>
    );
  }
}

export default App;

Your src/index.js file should look like this:

// src/index.js

import React from 'react';
import ReactDOM from 'react-dom';
import App from './containers/App';
import registerServiceWorker from './utils/registerServiceWorker';

ReactDOM.render(<App />, document.getElementById('root'));
registerServiceWorker();

Go to your browser and if every thing works fine you will see Hello World on your screen.

You can check my commit on Github.

Adding react-router

React-router will help us define the routes for our app. It's very customizable and very popular in the react ecosystem.

We will be using version 3.0.0 of react-router.

npm install --save react-router@3.0.0

Now, add a new file routes.js inside the src folder with the following code:

// routes.js

import React from 'react';
import { Router, Route } from 'react-router';

import App from './containers/App';

const Routes = (props) => (
  <Router {...props}>
    <Route path="/" component={ App }>
    </Route>
  </Router>
);

export default Routes;

The Router component wraps all the Route components. Based on the path prop of the Route component, the component passed to the component prop, will be rendered on the page. Here, we are setting up the root URL (/) to load our App component using the Router component.

<Router {...props}>
  <Route path="/" component={ <div>Hello World!</div> }>
  </Route>
</Router>

The above code is also valid. For the path /, the <div>Hello World!</div> will be mounted.

Now, we need to call our routes.js file from our src/index.js file. The file should have the following content:

// src/index.js

import React from 'react';
import ReactDOM from 'react-dom';
import { browserHistory } from 'react-router';

import App from './containers/App';
import Routes from './routes';
import registerServiceWorker from './utils/registerServiceWorker';

ReactDOM.render(
  <Routes history={browserHistory} />,
  document.getElementById('root')
);

registerServiceWorker();

Basically, we are mounting our Router component from our routes.js file. We pass in the history prop to it so that the routes know how to handle history tracking.

You can check my commit on Github.

Adding Firebase

If you don't have a Firebase account, create one now (it's free!) by going to their website. After you're done creating a new account, log into your account and go to the console page and click on Add project.

Enter the name of your project (I'll call mine reddit-clone), choose your country, and click on the Create project button.

Now, before we proceed we need to change the rules for the database since, by default, Firebase expects the user to be authenticated to be able to read and write data. If you select your project and click on the Database tab on the left, you will be able to see your database. You need to click on the Rules tab on the top that will redirect us to a screen which will have the following data:

Continue reading %How to Create a Reddit Clone Using React and Firebase%

React vs Angular: An In-depth Comparison

$
0
0

Should I choose Angular, or React? Today's bipolar landscape of JavaScript frameworks has left many of developers struggling to pick a side in this debate. Whether you're a newcomer trying to figure out where to start, a freelancer picking a framework for your next project or an enterprise-grade architect planning a strategic vision for your company, you're likely to benefit from having an educated view on this topic.

To save you some time, let me tell you something up front: this article won't give a clear answer on which framework is better. But neither will hundreds of other articles with similar titles. I can't tell you that because the answer depends on a wide range of factors which make a particular technology more or less suitable for your environment and use case.

Since we can't answer the question directly, we'll attempt something else. We'll compare Angular (2+, not the old AngularJS) and React to demonstrate how you can approach the problem of comparing any two frameworks in a structured manner on your own and tailor it to your environment. You know, the old "teach a man to fish" approach. That way, when both are replaced by a BetterFramework.js in a year's time, you will be able to re-create the same train of thought once more.

Where to Start?

Before you pick any tool you need to answer two simple questions: "Is this a good tool per se?" and "Will it work well for my use case?" None of them mean anything on their own, so you always need to keep both of them in mind. All right, the questions might not be that simple, so we'll try to break them down into smaller ones.

Questions on the tool itself:

  • How mature is it and who's behind it?
  • What kind of features does it have?
  • What architecture, development paradigms, and patterns does it employ?
  • What is the ecosystem around it?

Questions for self-reflection:

  • Will I and my colleagues be able to learn this tool with ease?
  • Does is fit well with my project?
  • What is the developer experience like?

Using this set of questions you can start your assessment of any tool and we'll base our comparison of React and Angular on them as well.

There's another thing we need to take into account. Strictly speaking, it's not exactly fair to compare Angular to React, since Angular is a full-blown feature-rich framework, and React just a UI component library. To even the odds, we'll talk about React in conjunction with some of the libraries often used with it.

Maturity

An important part of being a skilled developer is being able to keep the balance between established, time-proven approaches and evaluating new bleeding-edge tech. As a general rule, you should be careful when adopting tools which have not yet matured due to certain risks:

  • The tool might be buggy and unstable.
  • It might be unexpectedly abandoned by the vendor.
  • There might not be a large knowledge base or community available in case you need help.

Both React and Angular come from good families, so it seems that we can be confident in this regard.

React

React is developed and maintained by Facebook and used in their own products, including Instagram and WhatsApp. It has been around for roughly three and a half years now, so it's not exactly new. It's also one of the most popular projects on GitHub with about 60,000 stars at the time of writing. Sounds good to me.

Angular

Angular (version 2 and above) has been around less then React, but if you count in the history of its predecessor, AngularJS, the picture evens out. It's maintained by Google and used in AdWords and Google Fiber. Since AdWords is one of the key projects in Google, it is clear they have made a big bet on it and is unlikely to disappear anytime soon.

Features

Like I mentioned earlier, Angular has more features out of the box than React. This can be both a good and a bad thing, depending on how you look at it.

Both frameworks share some key features in common: components, data binding, and platform-agnostic rendering.

Angular

Angular provides a lot of the features required for a modern web application out of the box. Some of the standard features are:

  • Dependency injection;
  • Templates, based on an extended version of HTML;
  • Routing, provided by @angular/router;
  • Ajax requests by @angular/http;
  • @angular/forms for building forms;
  • Component CSS encapsulation;
  • XSS protection;
  • Utilities for unit-testing components.

Having all of these features available out of the box is highly convenient when you don't want to spend time picking the libraries yourself. However, it also means that you're stuck with some of them, even if you don't need them. And replacing them will usually require additional effort. For instance, we believe that for small projects having a DI system creates more overhead than benefit, considering it can be effectively replaced by imports.

React

With React, you're starting off with a more minimalistic approach. If we're looking at just React, here's what we have:

  • No dependency injection;
  • Instead of classic templates it has JSX, an XML-like language built on top of JavaScript;
  • XSS protection;
  • Utilities for unit-testing components.

Not much. And this can be a good thing. It means that you have the freedom to choose whatever additional libraries to add based on your needs. The bad thing is that you actually have to make those choices yourself. Some of the popular libraries that are often used together with React are:

We've found the freedom of choosing your own libraries liberating. This gives us the ability to tailor our stack to particular requirements of each project and we didn't find the cost of learning new libraries that high.

Languages, Paradigms, and Patterns

Taking a step back from the features of each framework, let's see what kind higher-level concepts are popular with both frameworks.

React

There are several important things that come to mind when thinking about React: JSX, Flow, and Redux.

JSX

JSX is a controversial topic for many developers: some enjoy it, and others think that it's a huge step back. Instead of following a classical approach of separating markup and logic, React decided to combine them within components using an XML-like language that allows you to write markup directly in your JavaScript code.

While the topic of mixing markup with JavaScript might be debatable, it has an indisputable benefit: static analysis. If you make an error in your JSX markup, the compiler will emit an error instead of continuing in silence. This helps by instantly catching typos and other silly errors. This is something we really miss in Angular.

Flow

Continue reading %React vs Angular: An In-depth Comparison%

Getting React Projects Ready Fast with Pre-configured Builds

$
0
0

Starting a new React project now days is not as simple as we'd like it to be. Instead of instantly diving into the code and bringing your application to life, you have to spend time configuring the right build tools to set up a local development environment, unit testing, and a production build. But there are projects where all you need is a simple set up to get things running quickly and with minimal efforts.

Create-react-app provides just that. It's a CLI tool from Facebook which allows you to generate a new React project and use a pre-configured Webpack build for development. Using it, you will never have to look at the Webpack config again.

How does create-react-app work?

Create-react-app is a standalone tool which should be installed globally via npm, and called each time you need to create a new project.

npm install -g create-react-app

To create a new project, run:

create-react-app react-app

Create-react-app will set up the following project structure:

.
├── .gitignore
├── README.md
├── package.json
├── node_modules
├── public
│   ├── favicon.ico
│   └── index.html
└── src
    ├── App.css
    ├── App.js
    ├── App.test.js
    ├── index.css
    ├── index.js
    └── logo.svg

It will also add a react-scripts package to your project which will contain all of the configuration and build scripts. In other words, your project depends react-scripts, not on create-react-app itself. Once the installation is complete, you can start working on your project.

Starting a Local Development Server

The first thing you'll need is a local development environment. Running npm start will fire up a Webpack development server with a watcher which will automatically reload the application once you change something. Hot reloading, however, is only supported for styles.

The application will be generated with a number of features built-in.

ES6 and ES7

The application comes with its own Babel preset, babel-preset-react-app, to support a set of ES6 and ES7 features. It even supports some of the newer features like async/await, and import/export statements. However, certain features, like decorators, have been intentionally left out.

Continue reading %Getting React Projects Ready Fast with Pre-configured Builds%

Higher Order Components: A React Application Design Pattern

$
0
0

In this article we will discuss how to use Higher Order Components to keep your React applications tidy, well structured and easy to maintain. We’ll discuss how pure functions keep code clean and how these same principles can be applied to React components.

Pure Functions

A function is considered pure if it adheres to the following properties:

  • All the data it deals with are declared as arguments
  • It does not mutate data it was given or any other data (these are often referred to as side effects).
  • Given the same input, it will always return the same output.

For example, the add function below is pure:

function add(x, y) {
  return x + y;
}

However, the function badAdd below is impure:

var y = 2;
function badAdd(x) {
  return x + y;
}

This function is not pure because it references data that it hasn’t directly been given. As a result, it’s possible to call this function with the same input and get different output:

var y = 2;
badAdd(3) // 5
y = 3;
badAdd(3) // 6

To read more about pure functions you can read “An introduction to reasonably pure programming” by Mark Brown.

Whilst pure functions are very useful, and make debugging and testing an application much easier, occasionally you will need to create impure functions that have side effects, or modify the behavior of an existing function that you are unable to access directly (a function from a library, for example). To enable this we need to look at higher order functions.

Higher Order Functions

A higher order function is a function that when called, returns another function. Often they also take a function as an argument, but this is not required for a function to be considered higher order.

Let’s say we have our add function from above, and we want to write some code so that when we call it we log the result to the console before returning the result. We’re unable to edit the add function, so instead we can create a new function:

function addAndLog(x, y) {
  var result = add(x, y);
  console.log('Result', result);
  return result;
}

We decide that logging results of functions is useful, and now we want to do the same with a subtract function. Rather than duplicate the above, we could write a higher order function that can take a function and return a new function that calls the given function and logs the result before then returning it:

function logAndReturn(func) {
  return function() {
    var args = Array.prototype.slice.call(arguments);
    var result = func.apply(null, args);
    console.log('Result', result);
    return result;
  }
}

Now we can take this function and use it to add logging to add and subtract:

var addAndLog = logAndReturn(add);
addAndLog(4, 4) // 8 is returned, ‘Result 8’ is logged

var subtractAndLog = logAndReturn(subtract);
subtractAndLog(4, 3) // 1 is returned, ‘Result 1’ is logged;

logAndReturn is a HOF because it takes a function as its argument and returns a new function that we can call. These are really useful for wrapping existing functions that you can’t change in behavior. For more information on this, check M. David Green’s article “Higher-Order Functions in JavaScript which goes into much more detail on the subject.

Additionally you can check out this CodePen, which shows the above code in action.

Higher Order Components

Moving into React land, we can use the same logic as above to take existing React components and give them some extra behaviours.

In this section we're going to use React Router, the de facto routing solution for React. If you'd like to get started with the library I highly recommend the React Router Tutorial on GitHub.

React Router’s Link component

React Router provides a <Link> component that is used to link between pages in a React application. One of the properties that this <Link> component takes is activeClassName. When a <Link> has this property and it is currently active (the user is on a URL that the link points to), the component will be given this class, enabling the developer to style it.

This is a really useful feature, and in our hypothetical application we decide that we always want to use this property. However, after doing so we quickly discover that this is making all our <Link> components very verbose:

<Link to="/" activeClassName="active-link">Home</Link>
<Link to="/about" activeClassName="active-link">About</Link>
<Link to="/contact" activeClassName="active-link">Contact</Link>

Notice that we are having to repeat the class name property every time. Not only does this make our components verbose, it also means that if we decide to change the class name we’ve got to do it in a lot of places.

Continue reading %Higher Order Components: A React Application Design Pattern%


React for Angular Developers

$
0
0

This article is for developers who are familiar with Angular 1.x and would like to learn more about React. We’ll look at the different approaches they take to building rich web applications, the overlapping functionality and the gaps that React doesn’t attempt to fill. After reading, you’ll have an understanding of the problems that React […]

Continue reading %React for Angular Developers%

React Quickly: How to Work with Forms in React

$
0
0

How to Work with Forms in React is an excerpt from React Quickly, a hands-on book by Azat Mardan for anyone who wants to learn React.js fast.

This article covers how to capture text input and input via other form elements like input, textarea, and option. Working with them is paramount to web development, because they allow our applications to receive data (e.g. text) and actions (e.g. clicks) from users.

The source code for the examples in this article is in the ch07 folder of the GitHub repository azat-co/react-quickly. Some demos can be found at http://reactquickly.co/demos.

If you enjoy this post, you might also like to watch our course Build React Forms with Redux.

Recommended Way of Working with Forms in React

In regular HTML, when we work with an input element, the page's DOM maintains that element's value in its DOM node. It's possible to access the value via methods like document.getElementById('email').value, or by using jQuery methods. The DOM is our storage.

In React, when working with forms or any other user input fields, such as standalone text fields or buttons, developers have an interesting problem to solve. From React's documentation:

React components must represent the state of the view at any point in time and not only at initialization time.

React is all about keeping things simple by using declarative styles to describe UIs. React describes the UI, its end stage, and how it should look.

Can you spot a conflict? In the traditional HTML form elements, the state of the elements will change with the user input. React uses a declarative approach to describe the UI. The input needs to be dynamic to reflect the state properly.

If developers opt not to maintain the component state (in JavaScript), or not to sync it with the view, then it adds problems: there might be a situation when internal state and view are different. React won't know about changed state. This can lead to all sorts of trouble, and mitigates the simple philosophy of React. The best practice is to keep React's render() as close to the real DOM as possible, and that includes the data in the form elements.

Consider this example of a text input field. React must include the new value in its render() for that component. Consequently, we need to set the value for our element to new value using value. If we implement an <input> field as we always did it in HTML, React will keep the render() in sync with the real DOM. React won't allow users to change the value. Try it yourself. It drives me nuts, but it's the appropriate behavior for React!

render() {
  return <input type="text" name="title" value="Mr." />
}

The code above represents the view at any state, and the value will always be “Mr.”. With input fields, they must change in response to the user keystrokes. Given these points, let's make the value dynamic.

This is a better implementation, because it'll be updated from the state:

render() {
  return <input type="text" name="title" value={this.state.title} />
}

What is the value of state? React can’t know about users typing in the form elements. Developers need to implement an event handler to capture changes with onChange.

handleChange(event) {
  this.setState({title: event.target.value})
}
render() {
  return <input type="text" name="title" value={this.state.title} onChange={this.handleChange.bind(this)}/>
}

Given these points, the best practice is for developers to implement the following things to sync the internal state with the view (Figure 1):

  1. define elements in render() using values from state
  2. capture changes of a form element using onChange() as they happen
  3. update the internal state in event handler
  4. save new values in state and then update the view with a new render()
Forms in React, Figure 1: Capturing changes in input and applying to state

Figure 1: Capturing changes in input and applying to state

It might seem like a lot of work at first glance, but I hope that by using React more, you'll appreciate this approach. It's called a one-way binding, because state only changes views. There's no trip back, only a one-way trip from state to view. With one-way binding, a library won't update state (or model) automatically. One of the main benefits of one-way binding is that it removes complexity when working with large apps where many views can implicitly update many states (data models) and vice versa—Figure 2.

Simple doesn’t always mean less code. Sometimes, like in this case, developers must write extra code to manually set the data from event handlers to the state (which is rendered to view), but this approach tends to be superior when it comes to complex user interfaces and single-page applications with a myriad of views and states. To put it concisely: simple isn’t always easy.

Forms in React, Figure 2: One-way vs two-way binding

Figure 2: One-way vs two-way binding

Conversely, a two-way binding allows views to change states automatically without developers explicitly implementing it. The two-way binding is how Angular 1 works. Interestingly, Angular 2 borrowed the concept of one-way binding from React and made it the default (you can still have two-way binding explicitly).

[affiliate-section title="Recommended Courses"][affiliate-card title="Job-Ready Angular and TypeScript Training" affiliatename="Todd Motto" text="The ultimate resource to learn Angular and its ecosystem. Use coupon code 'SITEPOINT' at checkout to get 25% off." url="https://ultimateangular.com/" imageurl="https://dab1nmslvvntp.cloudfront.net/wp-content/uploads/2017/08/1502370007todd.png"][/affiliate-section]

For this reason, we’ll cover the recommended approach of working with forms first. It's called controlled components and it ensures that the internal component state is always in sync with the view. The alternative approach is uncontrolled component.

So far, we’ve learned the best practice for working with input fields in React, which is to capture the change and apply it to state as depicted in Figure 1 (input to changed view). Next, let's look at how we define a form and its elements.

Continue reading %React Quickly: How to Work with Forms in React%

How to Learn React: Everything You Need to Get Started

$
0
0

React is a JavaScript library, originally built by developers at Facebook, for building fast user interfaces. If you’re dipping your toe into the React waters, or if your React development journey is picking up speed, it can be hard to stay across the fundamentals, techniques, tools and tricks – so we’ve created this guide to […]

Continue reading %How to Learn React: Everything You Need to Get Started%

How to Build a Todo App Using React, Redux, and Immutable.js

$
0
0

The way React uses components and a one-way data flow makes it ideal for describing the structure of user interfaces. However, its tools for working with state are kept deliberately simple --- to help remind us that React is just the View in the traditional Model-View-Controller architecture.

There's nothing to stop us from building large applications with just React, but we would quickly discover that to keep our code simple, we'd need to manage our state elsewhere.

Whilst there's no official solution for dealing with application state, there are some libraries that align particularly well with React's paradigm. In this post, we'll pair React with two such libraries and use them to build a simple application.

Redux

Redux is a tiny library that acts as a container for our application state, by combining ideas from Flux and Elm. We can use Redux to manage any kind of application state, providing we stick to the following guidelines:

  1. our state is kept in a single store
  2. changes come from actions and not mutations

At the core of a Redux store is a function that takes the current application state and an action and combines them to create a new application state. We call this function a reducer.

Our React components will be responsible for sending actions to our store, and in turn our store will tell the components when they need to re-render.

ImmutableJS

Because Redux doesn't allow us to mutate the application state, it can be helpful to enforce this by modeling application state with immutable data structures.

ImmutableJS offers us a number of immutable data structures with mutative interfaces, and they're implemented in an efficient way, inspired by the implementations in Clojure and Scala.

Demo

We're going to use React with Redux and ImmutableJS to build a simple todo list that allows us to add todos and toggle them between complete and incomplete.

See the Pen React, Redux & Immutable Todo by SitePoint (@SitePoint) on CodePen.

The code is available in a repository on GitHub.

Setup

We'll get started by creating a project folder and initializing a package.json file with npm init. Then we'll install the dependencies we're going to need.

npm install --save react react-dom redux react-redux immutable
npm install --save-dev webpack babel-core babel-loader babel-preset-es2015 babel-preset-react

We'll be using JSX and ES2015, so we'll compile our code with Babel, and we're going to do this as part of the module bundling process with Webpack.

First, we'll create our Webpack configuration in webpack.config.js:

module.exports = {
  entry: './src/app.js',
  output: {
    path: __dirname,
    filename: 'bundle.js'
  },
  module: {
    loaders: [
      {
        test: /\.js$/,
        exclude: /node_modules/,
        loader: 'babel-loader',
        query: { presets: [ 'es2015', 'react' ] }
      }
    ]
  }
};

Finally, we'll extend our package.json by adding an npm script to compile our code with source maps:

"script": {
  "build": "webpack --debug"
}

We'll need to run npm run build each time we want to compile our code.

React and Components

Before we implement any components, it can be helpful to create some dummy data. This helps us get a feel for what we're going to need our components to render:

const dummyTodos = [
  { id: 0, isDone: true,  text: 'make components' },
  { id: 1, isDone: false, text: 'design actions' },
  { id: 2, isDone: false, text: 'implement reducer' },
  { id: 3, isDone: false, text: 'connect components' }
];

For this application, we're only going to need two React components, <Todo /> and <TodoList />.

// src/components.js

import React from 'react';

export function Todo(props) {
  const { todo } = props;
  if(todo.isDone) {
    return <strike>{todo.text}</strike>;
  } else {
    return <span>{todo.text}</span>;
  }
}

export function TodoList(props) {
  const { todos } = props;
  return (
    <div className='todo'>
      <input type='text' placeholder='Add todo' />
      <ul className='todo__list'>
        {todos.map(t => (
          <li key={t.id} className='todo__item'>
            <Todo todo={t} />
          </li>
        ))}
      </ul>
    </div>
  );
}

At this point, we can test these components by creating an index.html file in the project folder and populating it with the following markup. (You can find a simple stylesheet on GitHub):

<!DOCTYPE html>
<html>
  <head>
    <link rel="stylesheet" href="style.css">
    <title>Immutable Todo</title>
  </head>
  <body>
    <div id="app"></div>
    <script src="bundle.js"></script>
  </body>
</html>

We'll also need an application entry point at src/app.js.

// src/app.js

import React from 'react';
import { render } from 'react-dom';
import { TodoList } from './components';

const dummyTodos = [
  { id: 0, isDone: true,  text: 'make components' },
  { id: 1, isDone: false, text: 'design actions' },
  { id: 2, isDone: false, text: 'implement reducer' },
  { id: 3, isDone: false, text: 'connect components' }
];

render(
  <TodoList todos={dummyTodos} />,
  document.getElementById('app')
);

Compile the code with npm run build, then navigate your browser to the index.html file and make sure that it's working.

Continue reading %How to Build a Todo App Using React, Redux, and Immutable.js%

Building a Game with Three.js, React and WebGL

$
0
0

I'm making a game titled "Charisma The Chameleon." It's built with Three.js, React and WebGL. This is an introduction to how these technologies work together using react-three-renderer (abbreviated R3R).

Check out A Beginner's Guide to WebGL and Getting Started with React and JSX here on SitePoint for introductions to React and WebGL. This article and the accompanying code use ES6 Syntax.

Hands holding a red pill and a blue pill, with a chameleon on one arm.

How It All Began

Some time ago, Pete Hunt made a joke about building a game using React in the #reactjs IRC channel:

I bet we could make a first person shooter with React!
Enemy has <Head /> <Body> <Legs> etc.

I laughed. He laughed. Everyone had a great time. "Who on earth would do that?" I wondered.

Years later, that's exactly what I'm doing.

Gameplay GIF of Charisma The Chameleon

Charisma The Chameleon is a game where you collect power-ups that make you shrink to solve an infinite fractal maze. I've been a React developer for a few years, and I was curious if there was a way to drive Three.js using React. That's when R3R caught my eye.

Why React?

I know what you're thinking: why? Humor me for a moment. Here's some reasons to consider using React to drive your 3D scene:

  • "Declarative" views let you cleanly separate your scene rendering from your game logic.
  • Design easy to reason about components, like <Player />, <Wall />, <Level />, etc.
  • "Hot" (live) reloading of game assets. Change textures and models and see them update live in your scene!
  • Inspect and debug your 3D scene as markup with native browser tools, like the Chrome inspector.
  • Manage game assets in a dependency graph using Webpack, eg <Texture src={ require('../assets/image.png') } />

Let's set up a scene to get an understanding of how this all works.

[affiliate-section title="Recommended Courses"][affiliate-card title="The Best Way to Learn React for Beginners" affiliatename="Wes Bos" text="A step-by-step training course to get you building real world React.js + Firebase apps and website components in a couple of afternoons. Use coupon code 'SITEPOINT' at checkout to get 25% off." url="https://ReactForBeginners.com/friend/SITEPOINT" imageurl="https://dab1nmslvvntp.cloudfront.net/wp-content/uploads/2017/07/1501203893wesbos.jpg"][/affiliate-section]

React and WebGL

I've created a sample GitHub repository to accompany this article. Clone the repository and follow the instructions in the README to run the code and follow along. It stars SitePointy the 3D Robot!

SitePointy the 3D robot screenshot

Warning: R3R is still in beta. Its API is volatile and may change in the future. It only handles a subset of Three.js at the moment. I've found it complete enough to build a full game, but your mileage may vary.

Organizing view code

The main benefit of using React to drive WebGL is our view code is decoupled from our game logic. That means our rendered entities are small components that are easy to reason about.

R3R exposes a declarative API that wraps Three.js. For example, we can write:

<scene>
  <perspectiveCamera
    position={ new THREE.Vector3( 1, 1, 1 )
  />
</scene>

Now we have an empty 3D scene with a camera. Adding a mesh to the scene is as simple as including a <mesh /> component, and giving it <geometry /> and a <material />.

<scene>
  …
  <mesh>
    <boxGeometry
      width={ 1 }
      height={ 1 }
      depth={ 1 }
    />
    <meshBasicMaterial
      color={ 0x00ff00 }
    />
</mesh>

Under the hood, this creates a THREE.Scene and automatically adds a mesh with THREE.BoxGeometry. R3R handles diffing the old scene with any changes. If you add a new mesh to the scene, the original mesh won't be recreated. Just as with vanilla React and the DOM, the 3D scene is only updated with the differences.

Because we're working in React, we can separate game entities into component files. The Robot.js file in the example repository demonstrates how to represent the main character with pure React view code. It's a "stateless functional" component, meaning it doesn't hold any local state:

const Robot = ({ position, rotation }) => <group
  position={ position }
  rotation={ rotation }
>
  <mesh rotation={ localRotation }>
    <geometryResource
      resourceId="robotGeometry"
    />
    <materialResource
      resourceId="robotTexture"
    />
  </mesh>
</group>;

And now we include the <Robot /> in our 3D scene!

<scene>
  …
  <mesh>…</mesh>
  <Robot
    position={…}
    rotation={…}
  />
</scene>

You can see more examples of the API on the R3R GitHub repository, or view the complete example setup in the accompanying project.

Continue reading %Building a Game with Three.js, React and WebGL%

Building Animated Components, or How React Makes D3 Better

$
0
0

D3 is great. As the jQuery of the web data visualization world, it can do everything you can think of.

Many of the best data visualizations you've seen online use D3. It's a great library, and with the recent v4 update, it became more robust than ever.

Add React, and you can make D3 even better.

Just like jQuery, D3 is powerful but low level. The bigger your visualization, the harder your code becomes to work with, the more time you spend fixing bugs and pulling your hair out.

React can fix that.

You can read my book React+d3js ES6 for a deep insight, or keep reading for an overview of how to best integrate React and D3. In a practical example, we'll see how to build declarative, transition-based animations.

A version of this article also exists as a D3 meetup talk on YouTube.

Is React Worth It?

OK, React is big. It adds a ton of code to your payload, and it increases your dependency footprint. It’s yet another library that you have to keep updated.

If you want to use it effectively, you'll need a build step. Something to turn JSX code into pure JavaScript.

Setting up Webpack and Babel is easy these days: just run create-react-app. It gives you JSX compilation, modern JavaScript features, linting, hot loading, and code minification for production builds. It's great.

Despite the size and tooling complexity, React is worth it, especially if you're serious about your visualization. If you're building a one-off that you’ll never have to maintain, debug, or expand, stick to pure D3. If you're building something real, I encourage you to add React to the mix.

To me, the main benefit is that React forces strongly encourages you to componentize your code. The other benefits are either symptoms of componentization, or made possible by it.

The main benefits of using React with your D3 code are:

  • componentization
  • easier testing and debugging
  • smart DOM redraws
  • hot loading

Componentization encourages you to build your code as a series of logical units --- components. With JSX, you can use them like they were HTML elements: <Histogram />, <Piechart />, <MyFancyThingThatIMade />. We'll dive deeper into that in the next section.

Building your visualization as a series of components makes it easier to test and debug. You can focus on logical units one at a time. If a component works here, it will work over there as well. If it passes tests and looks nice, it will pass tests and look nice no matter how often you render it, no matter where you put it, and no matter who calls it. 🙌

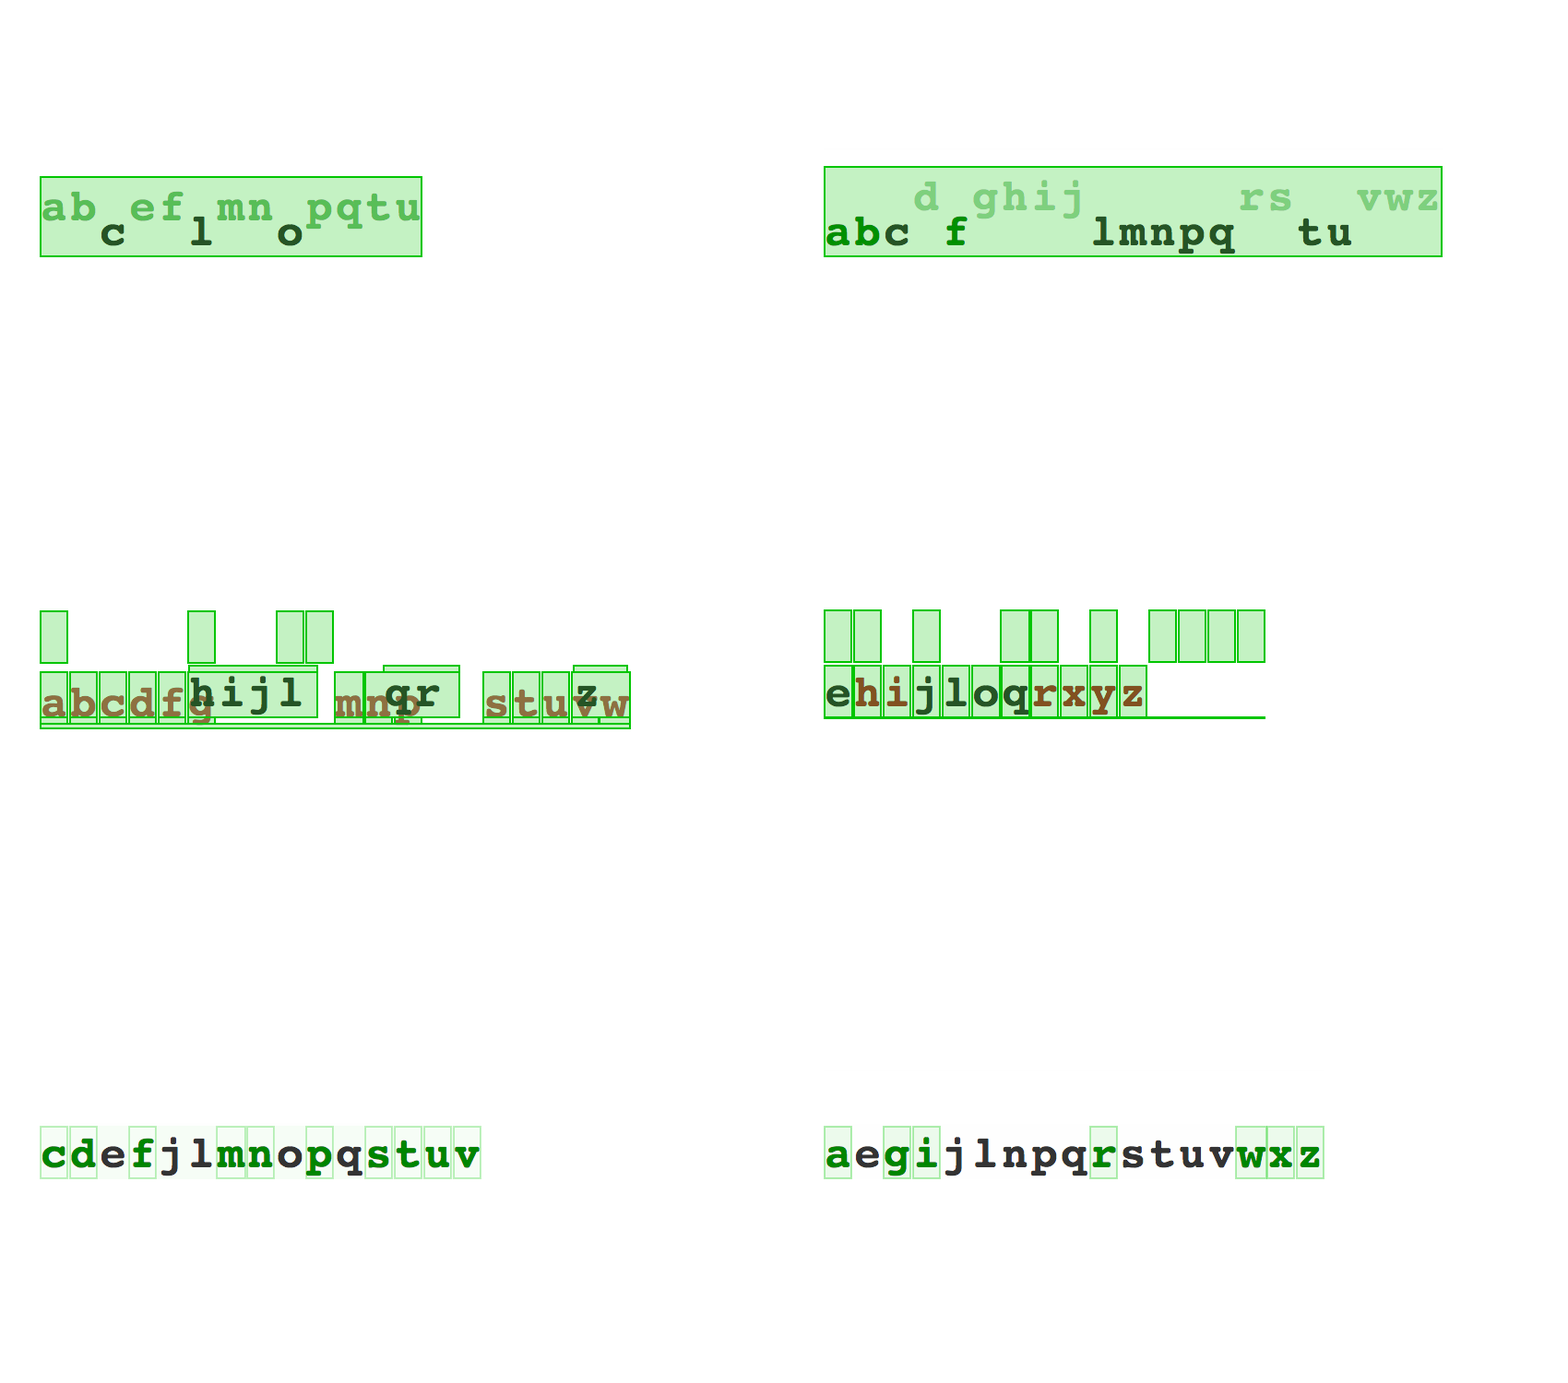
React understands the structure of your code, so it knows how to redraw only the components that have changes. There’s no more hard work in deciding what to re-render and what to leave alone. Just change and forget. React can figure it out on its own. And yes, if you look at a profiling tool, you'll see that only the parts with changes are re-rendered.

Animated alphabet with flash paint enabled

Using create-react-app to configure your tooling, React can utilize hot loading. Let's say you're building a visualization of 30,000 datapoints. With pure D3, you have to refresh the page for every code change. Load the dataset, parse the dataset, render the dataset, click around to reach the state you're testing … yawn.

With React -> no reload, no waiting. Just immediate changes on the page. When I first saw it in action, it felt like eating ice cream while the crescendo of 1812 Overture plays in the background. Mind = blown.

Benefits of Componentization

Components this, components that. Blah blah blah. Why should you care? Your dataviz code already works. You build it, you ship it, you make people happy.

But does the code make you happy? With components, it can. Components make your life easier because they make your code:

  • declarative
  • reusable
  • understandable
  • organized

It's okay if that sounds like buzzword soup. Let me show you.

For instance, declarative code is the kind of code where you say what you want, not how you want it. Ever written HTML or CSS? You know how to write declarative code! Congratz!

React uses JSX to make your JavaScript look like HTML. But don't worry, it all compiles to pure JavaScript behind the scenes.

Try to guess what this code does:

render() {
  // ...
  return (
    <g transform={translate}>
      <Histogram data={this.props.data}
         value={(d) => d.base_salary}
         x={0}
         y={0}
         width={400}
         height={200}
         title="All" />
      <Histogram data={engineerData}
         value={(d) => d.base_salary}
         x={450}
         y={0}
         width={400}
         height={200}
         title="Engineer" />
      <Histogram data={programmerData}
         value={(d) => d.base_salary}
         x={0}
         y={220}
         width={400}
         height={200}
         title="Programmer"/>
      <Histogram data={developerData}
         value={(d) => d.base_salary}
         x={450}
         y={220}
         width={400}
         height={200}
         title="Developer" />
    </g>
  )
}

If you guessed "Renders four histograms", you were right. Hooray.

After you create a Histogram component, you can use it like it was a normal piece of HTML. A histogram shows up anywhere you put <Histogram /> with the right parameters.

In this case, the parameters are x and y coordinates, width and height sizing, the title, some data, and a value accessor. They can be anything your component needs.

Parameters look like HTML attributes, but can take any JavaScript object, even functions. It's like HTML on steroids.

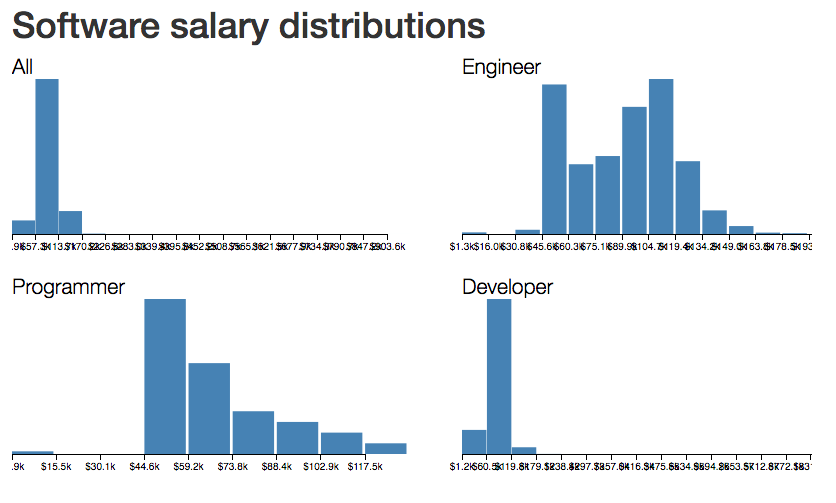
With some boilerplate and the right dataset, that code above gives you a picture like this. A comparison of salary distributions for different types of people who write software.

4 histograms of salary distributions

Look at the code again. Notice how reusable components are? It's like <Histogram /> was a function that created a histogram. Behind the scenes it does compile into a function call --- (new Histogram()).render(), or something similar. Histogram becomes a class, and you call an instance's render function every time you use <Histogram />.

React components should follow the principles of good functional programming. No side effects, statelessness, idempotency, comparability. Unless you really, really want to break the rules.

Unlike JavaScript functions, where following these principles requires deliberate effort, React makes it hard not to code that way. That's a win when you work in a team.

Declarativeness and reusability make your code understandable by default. If you've ever used HTML, you can read what that code does. You might not understand the details, but if you know some HTML and JavaScript, you know how to read JSX.

Complex components are made out of simpler components, which are made out of even simpler components, which are eventually made out of pure HTML elements. This keeps your code organized.

When you come back in six months, you can look at your code and think, "Ah yes, four histograms. To tweak this, I should open the Histogram component and poke around."

React takes the principles I’ve always loved about fancy-pants functional programming and makes them practical. I love that.

Let me show you an example --- an animated alphabet.

Continue reading %Building Animated Components, or How React Makes D3 Better%

How to Test React Components Using Jest

$
0
0

This article is by guest author Jack Franklin. SitePoint guest posts aim to bring you engaging content from prominent writers and speakers of the JavaScript community.

In this article, we'll take a look at using Jest --- a testing framework maintained by Facebook --- to test our ReactJS components. We'll look at how we can use Jest first on plain JavaScript functions, before looking at some of the features it provides out of the box specifically aimed at making testing React apps easier. It's worth noting that Jest isn't aimed specifically at React: you can use it to test any JavaScript applications. However, a couple of the features it provides come in really handy for testing user interfaces, which is why it's a great fit with React.

A Jester Juggling React Icons

Sample Application

Before we can test anything, we need an application to test! Staying true to web development tradition, I've built a small todo application that we'll use as the starting point. You can find it, along with all the tests that we're about to write, on GitHub. If you'd like to play with the application to get a feel for it, you can also find a live demo online.

The application is written in ES2015, compiled using Webpack with the Babel ES2015 and React presets. I won't go into the details of the build set up, but it's all in the GitHub repo if you'd like to check it out. You'll find full instructions in the README on how to get the app running locally. If you'd like to read more, the application is built using Webpack, and I recommend "A Beginner's guide to Webpack" as a good introduction to the tool.

The entry point of the application is app/index.js, which just renders the Todos component into the HTML:

render(
  <Todos />,
  document.getElementById('app')
);

The Todos component is the main hub of the application. It contains all the state (hard-coded data for this application, which in reality would likely come from an API or similar), and has code to render the two child components: Todo, which is rendered once for each todo in the state, and AddTodo, which is rendered once and provides the form for a user to add a new todo.

Because the Todos component contains all the state, it needs the Todo and AddTodo components to notify it whenever anything changes. Therefore, it passes functions down into these components that they can call when some data changes, and Todos can update the state accordingly.

Finally, for now, you'll notice that all the business logic is contained in app/state-functions.js:

export function toggleDone(state, id) {…}

export function addTodo(state, todo) {…}

export function deleteTodo(state, id) {…}

These are all pure functions that take the state and some data, and return the new state. If you're unfamiliar with pure functions, they are functions that only reference data they are given and have no side effects. For more, you can read my article on A List Apart on pure functions and my article on SitePoint about pure functions and React.

If you're familiar with Redux, they're fairly similar to what Redux would call a reducer. In fact, if this application got much bigger I would consider moving into Redux for a more explicit, structured approach to data. But for this size application you'll often find that local component state and some well abstracted functions to be more than enough.

To TDD or Not to TDD?

There have been many articles written on the pros and cons of test-driven development, where developers are expected to write the tests first, before writing the code to fix the test. The idea behind this is that, by writing the test first, you have to think about the API that you're writing, and it can lead to a better design. For me, I find that this very much comes down to personal preference and also to the sort of thing I'm testing. I've found that, for React components, I like to write the components first and then add tests to the most important bits of functionality. However, if you find that writing tests first for your components fits your workflow, then you should do that. There's no hard rule here; do whatever feels best for you and your team.

Note that this article will focus on testing front-end code. If you're looking for something focused on the back end, be sure to check out SitePoint's course Test-Driven Development in Node.js.

Introducing Jest

Jest was first released in 2014, and although it initially garnered a lot of interest, the project was dormant for a while and not so actively worked on. However, Facebook has invested the last year into improving Jest, and recently published a few releases with impressive changes that make it worth reconsidering. The only resemblance of Jest compared to the initial open-source release is the name and the logo. Everything else has been changed and rewritten. If you'd like to find out more about this, you can read Christoph Pojer's comment, where he discusses the current state of the project.

If you've been frustrated by setting up Babel, React and JSX tests using another framework, then I definitely recommend giving Jest a try. If you've found your existing test setup to be slow, I also highly recommend Jest. It automatically runs tests in parallel, and its watch mode is able to run only tests relevant to the changed file, which is invaluable when you have a large suite of tests. It comes with JSDom configured, meaning you can write browser tests but run them through Node, can deal with asynchronous tests and has advanced features such as mocking, spies and stubs built in.

Installing and Configuring Jest

To start with, we need to get Jest installed. Because we're also using Babel, we'll install another couple of modules that make Jest and Babel play nicely out of the box:

npm install --save-dev babel-jest babel-polyfill babel-preset-es2015 babel-preset-react jest

You also need to have a .babelrc file with Babel configured to use any presets and plugins you need. The sample project already has this file, which looks like so:

{
  "presets": ["es2015", "react"]
}

We won't install any React testing tools yet, because we're not going to start with testing our components, but our state functions.

Jest expects to find our tests in a __tests__ folder, which has become a popular convention in the JavaScript community, and it's one we're going to stick to here. If you're not a fan of the __tests__ setup, out of the box Jest also supports finding any .test.js and .spec.js files too.

As we'll be testing our state functions, go ahead and create __tests__/state-functions.test.js.

We'll write a proper test shortly, but for now, put in this dummy test, which will let us check everything's working correctly and we have Jest configured.

describe('Addition', () => {
  it('knows that 2 and 2 make 4', () => {
    expect(2 + 2).toBe(4);
  });
});

Now, head into your package.json. We need to set up npm test so that it runs Jest, and we can do that simply by setting the test script to run jest.

"scripts": {
  "test": "jest"
}

If you now run npm test locally, you should see your tests run, and pass!

PASS  __tests__/state-functions.test.js
  Addition
    ✓ knows that 2 and 2 make 4 (5ms)

Test Suites: 1 passed, 1 total
Tests:       1 passed, 1 total
Snapshots:   0 passed, 0 total
Time:        3.11s

If you've ever used Jasmine, or most testing frameworks, the above test code itself should be pretty familiar. Jest lets us use describe and it to nest tests as we need to. How much nesting you use is up to you; I like to nest mine so all the descriptive strings passed to describe and it read almost as a sentence.

When it comes to making actual assertions, you wrap the thing you want to test within an expect() call, before then calling an assertion on it. In this case, we've used toBe. You can find a list of all the available assertions in the Jest documentation. toBe checks that the given value matches the value under test, using === to do so. We'll meet a few of Jest's assertions through this tutorial.

Testing Business Logic

Now we've seen Jest work on a dummy test, let's get it running on a real one! We're going to test the first of our state functions, toggleDone. toggleDone takes the current state and the ID of a todo that we'd like to toggle. Each todo has a done property, and toggleDone should swap it from true to false, or vice-versa.

If you're following along with this, make sure you've cloned the repo and have copied the app folder to the same directory that contains your ___tests__ folder. You'll also need to install the shortid package (npm install shortid --save), which is a dependency of the Todo app.

I'll start by importing the function from app/state-functions.js, and setting up the test's structure. Whilst Jest allows you to use describe and it to nest as deeply as you'd like to, you can also use test, which will often read better. test is just an alias to Jest's it function, but can sometimes make tests much easier to read and less nested.

For example, here's how I would write that test with nested describe and it calls:

import { toggleDone } from '../app/state-functions';

describe('toggleDone', () => {
  describe('when given an incomplete todo', () => {
    it('marks the todo as completed', () => {
    });
  });
});

And here's how I would do it with test:

import { toggleDone } from '../app/state-functions';

test('toggleDone completes an incomplete todo', () => {
});

The test still reads nicely, but there's less indentation getting in the way now. This one is mainly down to personal preference; choose whichever style you're more comfortable with.

Now we can write the assertion. First we'll create our starting state, before passing it into toggleDone, along with the ID of the todo that we want to toggle. toggleDone will return our finish state, which we can then assert on:

const startState = {
  todos: [{ id: 1, done: false, name: 'Buy Milk' }]
};

const finState = toggleDone(startState, 1);

expect(finState.todos).toEqual([
  { id: 1, done: true, name: 'Buy Milk' }
]);

Notice now that I use toEqual to make my assertion. You should use toBe on primitive values, such as strings and numbers, but toEqual on objects and arrays. toEqual is built to deal with arrays and objects, and will recursively check each field or item within the object given to ensure that it matches.

With that we can now run npm test and see our state function test pass:

PASS  __tests__/state-functions.test.js
  ✓ tooggleDone completes an incomplete todo (9ms)

Test Suites: 1 passed, 1 total
Tests:       1 passed, 1 total
Snapshots:   0 passed, 0 total
Time:        3.166s

Rerunning Tests on Changes

It's a bit frustrating to make changes to a test file and then have to manually run npm test again. One of Jest's best features is its watch mode, which watches for file changes and runs tests accordingly. It can even figure out which subset of tests to run based on the file that changed. It's incredibly powerful and reliable, and you're able to run Jest in watch mode and leave it all day whilst you craft your code.

To run it in watch mode, you can run npm test -- --watch. Anything you pass to npm test after the first -- will be passed straight through to the underlying command. This means that these two commands are effectively equivalent:

  • npm test -- --watch
  • jest --watch

I would recommend that you leave Jest running in another tab, or terminal window, for the rest of this tutorial.

Before moving onto testing the React components, we'll write one more test on another one of our state functions. In a real application I would write many more tests, but for the sake of the tutorial, I'll skip some of them. For now, let's write a test that ensures that our deleteTodo function is working. Before seeing how I've written it below, try writing it yourself and seeing how your test compares.

Show me the test

Remember that you will have to update the import statement at the top to import deleteTodo along with toggleTodo:

import { toggleTodo, deleteTodo } from '../app/state-functions';

And here's how I've written the test:

test('deleteTodo deletes the todo it is given', () =&gt; {
    const startState = {
      todos: [{ id: 1, done: false, name: 'Buy Milk' }]
    };

    const finState = deleteTodo(startState, 1);

    expect(finState.todos).toEqual([]);
  });
  

The test doesn't vary too much from the first: we set up our initial state, run our function and then assert on the finished state. If you left Jest running in watch mode, notice how it picks up your new test and runs it, and how quick it is to do so! It's a great way to get instant feedback on your tests as you write them.

The tests above also demonstrate the perfect layout for a test, which is:

  • set up
  • execute the function under test
  • assert on the results.

By keeping the tests laid out in this way, you'll find them easier to follow and work with.

Now we're happy testing our state functions, let's move on to React components.

Continue reading %How to Test React Components Using Jest%


Redux vs MobX: Which Is Best for Your Project?

$
0
0

For a lot of JavaScript developers, the biggest complaint with Redux is the amount of boilerplate code needed to implement features. A better alternative is MobX which provides similar functionality but with lesser code to write.

For MobX newbies, take a quick look at this introduction written by MobX's creator. You can also work through this tutorial to gain some practical experience.

The goal of this article is to help JavaScript developers decide which of these two state management solutions are best for their projects. I've migrated this CRUD Redux project to MobX to use as an example in this article. I'll first discuss the pros and cons of using MobX, and then I'll demonstrate actual code samples from both versions to show the difference.

The code for the projects mentioned in this article can be found on GitHub:

If you enjoy this post, you might also like to sign up for SitePoint Premium and watch our course on working with forms using React and Redux.

Pieces of data shaped like birds, migrating Redux to MobX

What Do Redux and MobX Have in Common?

First, let's look at what they both have in common. They:

  • are open-source libraries
  • provide client-side state management
  • support time-travel debugging via the redux-devtools-extension
  • are not tied to a specific framework
  • have extensive support for React/React Native frameworks.

4 Reasons to Use MobX

Let's now look at the main differences between Redux and MobX.

1. Easy to learn and use

For a beginner, you can learn how to use MobX in just 30 minutes. Once you learn the basics, that's it. You don't need to learn anything new. With Redux, the basics are easy too. However, once you start building more complex applications, you'll have to deal with:

  • handling async actions with redux-thunk
  • simplifying your code with redux-saga
  • defining selectors to handle computed values, etc.

With MobX, all these situations are "magically" taken care of. You don't need additional libraries to handle such situations.

2. Less code to write

To implement a feature in Redux, you need to update at least four artifacts. This includes writing code for reducers, actions, containers and components. This is particularly annoying if you're working on a small project. MobX only requires you to update at least two artifacts (i.e. the store and the view component).

3. Full support for object-oriented programming

If you prefer writing object-oriented code, you'll be pleased to know you can use OOP to implement state management logic with MobX. Through the use of decorators such as @observable and @observer, you can easily make your plain JavaScript components and stores reactive. If you prefer functional programming, no problem --- that's supported as well. Redux, on the other hand, is heavily geared towards functional programming principles. However, you can use the redux-connect-decorator library if you want a class-based approach.

4. Dealing with nested data is easy

In most JavaScript applications, you'll find yourself working with relational or nested data. To be able to use it in a Redux store, you'll have to normalize it first. Next, you have to write some more code to manage tracking of references in normalized data.

In MobX, it's recommended to store your data in a denormalized form. MobX can keep track of the relations for you, and will automatically re-render changes. By using domain objects to store your data, you can refer directly to other domain objects defined in other stores. In addition, you can use (@)computed decorators and modifiers for observables to easily solve complex data challenges.

3 Reasons Not to Use MobX

1. Too much freedom

Redux is a framework that provides strict guidelines on how you write state code. This means you can easily write tests and develop maintainable code. MobX is a library and has no rules on how to implement it. The danger with this is that it's very easy to take shortcuts and apply quick fixes that can lead to unmaintainable code.

2. Hard to debug

MobX's internal code "magically" handles a lot of logic to make your application reactive. There's an invisible area where your data passes between the store and your component, which makes it difficult to debug when you have a problem. If you change state directly in components, without using @actions, you'll have a hard time pinpointing the source of a bug.

3. There could be a better alternative to MobX

In software development, new emerging trends appear all the time. Within a few short years, current software techniques can quickly loose momentum. At the moment, there are several solutions competing with both Redux and Mobx. A few examples are Relay/Apollo & GraphQL, Alt.js and Jumpsuit. Any of these technologies has the potential to become the most popular. If you really want to know which one is best for you, you'll have to try them all.

Continue reading %Redux vs MobX: Which Is Best for Your Project?%

Build a CRUD App Using React, Redux and FeathersJS

$
0
0

Building a modern project requires splitting the logic into front-end and back-end code. The reason behind this move is to promote code re-usability. For example, we may need to build a native mobile application that accesses the back-end API. Or we may be developing a module that will be part of a large modular platform.

The popular way of building a server-side API is to use a library like Express or Restify. These libraries make creating RESTful routes easy. The problem with these libraries is that we will find ourselves writing a TON of REPEATING CODE. We will also need to write code for authorization and other middleware logic.

To escape this dilemma, we can use a framework like Loopback or Feathersjs to help us generate an API.

At the time of writing, Loopback has more GitHub stars and downloads than Feathers. Loopback is a great library for generating RESTful CRUD endpoints in a short period of time. However, it does have a slight learning curve and the documentation is not easy to get along with. It has stringent framework requirements. For example, all models must inherit one of its built-in model class. If you need real-time capabilities in Loopback, be prepared to do some additional coding to make it work.

FeathersJS, on the other hand, is much easier to get started with and has realtime support built-in. Quite recently the Auk version was released (because Feathers is so modular, they use bird names for version names) which introduced a vast number of changes and improvements in a number of areas. According to a post they published on their blog, they are now the 4th most popular real-time web framework. It has excellent documentation and they have covered pretty much any area we can think of on building a real-time API.

What makes Feathers amazing is its simplicity. The entire framework is modular and we only need to install the features we need. Feathers itself is a thin wrapper built on top of express where they've added new features namely services and hooks. Feathers also allows us to effortlessly send and receive data over web sockets.

Prerequisites

Before you get started with the tutorial, you'll need to have a solid foundation in the following topics:

On your machine, you will need to have installed recent versions of:

  • NodeJS 6+
  • Mongodb 3.4+
  • Yarn package manager (optional)
  • Chrome browser

If you have never written a database API in JavaScript before, I would recommend first taking a look at this tutorial on creating RESTful APIs.

Scaffold the App

We are going to build a CRUD contact manager application using React, Redux, Feathers and MongoDB. You can take a look at the completed project here.

In this tutorial, I'll show you how to build the application from the bottom up. We'll kick-start our project using the create-react-app tool.

# scaffold a new react project
create-react-app react-contact-manager
cd react-contact-manager

# delete unnecessary files
rm src/logo.svg src/App.css

Use your favorite code editor and remove all the content in index.css. Open App.js and rewrite the code like this:

import React, { Component } from 'react';

class App extends Component {
  render() {
    return (
      <div>
        <h1>Contact Manager</h1>
      </div>
    );
  }
}

export default App;

Make sure to run yarn start to ensure the project is running as expected. Check the console tab to ensure that our project is running cleanly with no warnings or errors. If everything is running smoothly, use Ctrl+C to stop the server.

Build the API Server with Feathers

Let's proceed with generating the back-end API for our CRUD project using the feathers-cli tool.

# Install Feathers command-line tool
npm install -g feathers-cli

# Create directory for the back-end code
mkdir backend
cd backend

# Generate a feathers back-end API server
feathers generate app

? Project name | backend
? Description | contacts API server
? What folder should the source files live in? | src
? Which package manager are you using (has to be installed globally)? | Yarn
? What type of API are you making? | REST, Realtime via Socket.io

# Generate RESTful routes for Contact Model
feathers generate service

? What kind of service is it? | Mongoose
? What is the name of the service? | contact
? Which path should the service be registered on? | /contacts
? What is the database connection string? | mongodb://localhost:27017/backend


# Install email field type
yarn add mongoose-type-email

# Install the nodemon package
yarn add nodemon --dev

Open backend/package.json and update the start script to use nodemon so that the API server will restart automatically whenever we make changes.

// backend/package.json

....
"scripts": {
    ...
    "start": "nodemon src/",
    ...
  },
...

Let's open backend/config/default.json. This is where we can configure MongoDB connection parameters and other settings. I've also increased the default paginate value to 50, since in this tutorial we won't write front-end logic to deal with pagination.

{
  "host": "localhost",
  "port": 3030,
  "public": "../public/",
  "paginate": {
    "default": 50,
    "max": 50
  },
  "mongodb": "mongodb://localhost:27017/backend"
}

Open backend/src/models/contact.model.js and update the code as follows:

// backend/src/models/contact.model.js

require('mongoose-type-email');

module.exports = function (app) {
  const mongooseClient = app.get('mongooseClient');
  const contact = new mongooseClient.Schema({
    name : {
      first: {
        type: String,
        required: [true, 'First Name is required']
      },
      last: {
        type: String,
        required: false
      }
    },
    email : {
      type: mongooseClient.SchemaTypes.Email,
      required: [true, 'Email is required']
    },
    phone : {
      type: String,
      required: [true, 'Phone is required'],
      validate: {
        validator: function(v) {
          return /^\+(?:[0-9] ?){6,14}[0-9]$/.test(v);
        },
        message: '{VALUE} is not a valid international phone number!'
      }
    },
    createdAt: { type: Date, 'default': Date.now },
    updatedAt: { type: Date, 'default': Date.now }
  });

  return mongooseClient.model('contact', contact);
};

In addition to generating the contact service, Feathers has also generated a test case for us. We need to fix the service name first for it to pass:

// backend/test/services/contact.test.js

const assert = require('assert');
const app = require('../../src/app');

describe('\'contact\' service', () => {
  it('registered the service', () => {
    const service = app.service('contacts'); // change contact to contacts

    assert.ok(service, 'Registered the service');
  });
});

Open a new terminal and inside the backend directory, execute yarn test. You should have all the tests running successfully. Go ahead and execute yarn start to start the backend server. Once the server has finished starting it should print the line: 'Feathers application started on localhost:3030'.

Launch your browser and access the url: http://localhost:3030/contacts. You should expect to receive the following JSON response:

{"total":0,"limit":50,"skip":0,"data":[]}

Now let's use Postman to confirm all CRUD restful routes are working. You can launch Postman using this button:

Run in Postman

If you are new to Postman, check out this tutorial. When you hit the SEND button, you should get your data back as the response along with three additional fields which are _id, createdAt and updatedAt.

Use the following JSON data to make a POST request using Postman. Paste this in the body and set content-type to application/json.

{
  "name": {
    "first": "Tony",
    "last": "Stark"
  },
  "phone": "+18138683770",
  "email": "tony@starkenterprises.com"
}

Build the UI

Let's start by installing the necessary front-end dependencies. We'll use semantic-ui css/semantic-ui react to style our pages and react-router-dom to handle route navigation.

Important: Make sure you are installing outside the backend directory

// Install semantic-ui
yarn add semantic-ui-css semantic-ui-react

// Install react-router
yarn add react-router-dom

Update the project structure by adding the following directories and files:

|-- react-contact-manager
    |-- backend
    |-- node_modules
    |-- public
    |-- src
        |-- App.js
        |-- App.test.js
        |-- index.css
        |-- index.js
        |-- components
        |   |-- contact-form.js #(new)
        |   |-- contact-list.js #(new)
        |-- pages
            |-- contact-form-page.js #(new)
            |-- contact-list-page.js #(new)

Let's quickly populate the JS files with some placeholder code.

For the component contact-list.js, we'll write it in this syntax since it will be a purely presentational component.

// src/components/contact-list.js

import React from 'react';

export default function ContactList(){
  return (
    <div>
      <p>No contacts here</p>
    </div>
  )
}

For the top-level containers, I use pages. Let's provide some code for the contact-list-page.js

// src/pages/contact-list-page.js

import React, { Component} from 'react';
import ContactList from '../components/contact-list';

class ContactListPage extends Component {
  render() {
    return (
      <div>
        <h1>List of Contacts</h1>
        <ContactList/>
      </div>
    )
  }
}

export default ContactListPage;

For the contact-form component, it needs to be smart, since it is required to manage its own state, specifically form fields. For now, we'll place this placeholder code.

// src/components/contact-form.js
import React, { Component } from 'react';

class ContactForm extends Component {
  render() {
    return (
      <div>
        <p>Form under construction</p>
      </div>
    )
  }
}

export default ContactForm;

Populate the contact-form-page with this code:

// src/pages/contact-form-page.js

import React, { Component} from 'react';
import ContactForm from '../components/contact-form';

class ContactFormPage extends Component {
  render() {
    return (
      <div>
        <ContactForm/>
      </div>
    )
  }
}

export default ContactFormPage;

Now, let's create the navigation menu and define the routes for our App. App.js is often referred to as the 'layout template' for the Single Page Application.

Continue reading %Build a CRUD App Using React, Redux and FeathersJS%

Building a React Universal Blog App: A Step-by-Step Guide

$
0
0

When the topic of single page applications (SPAs) comes up, we tend to think of browsers, JavaScript, speed, and invisibility to search engines. This is because an SPA renders a page's content using JavaScript, and since web crawlers don't use a browser to view web pages, they can't view and index the content --- or at least most of them can't.

This is a problem that some developers have tried to solve in various ways:

  1. Adding an escaped fragment version of a website, which requires all pages to be available in static form and adds a lot of extra work (now deprecated).
  2. Using a paid service to un-browserify an SPA into static markup for search engine spiders to crawl.
  3. Trusting that search engines are now advanced enough to read our JavaScript-only content. (I wouldn't just yet.)

Using Node.js on the server and React on the client, we can build our JavaScript app to be universal (or isomorphic). This could offer several benefits from server-side and browser-side rendering, allowing both search engines and humans using browsers to view our SPA content.

In this step-by-step tutorial, I'll show you how to build a React Universal Blog App that will first render markup on the server side to make our content available to search engines. Then, it will let the browser take over in a single page application that is both fast and responsive.

Building a React Universal Blog App

Getting Started

Our universal blog app will make use of the following technologies and tools:

  1. Node.js for package management and server-side rendering
  2. React for UI views
  3. Express for an easy back-end JS server framework
  4. React Router for routing
  5. React Hot Loader for hot loading in development
  6. Flux for data flow
  7. Cosmic JS for content management

To start, run the following commands:

mkdir react-universal-blog
cd react-universal-blog

Now create a package.json file and add the following content:

{
  "name": "react-universal-blog",
  "version": "1.0.0",
  "engines": {
    "node": "4.1.2",
    "npm": "3.5.2"
  },
  "description": "",
  "main": "app-server.js",
  "dependencies": {
    "babel-cli": "^6.26.0",
    "babel-loader": "^7.1.2",
    "babel-preset-es2015": "^6.24.1",
    "babel-preset-es2017": "^6.24.1",
    "babel-preset-react": "^6.24.1",
    "babel-register": "^6.26.0",
    "cosmicjs": "^2.4.0",
    "flux": "^3.1.3",
    "history": "1.13.0",
    "hogan-express": "^0.5.2",
    "html-webpack-plugin": "^2.30.1",
    "path": "^0.12.7",
    "react": "^15.6.1",
    "react-dom": "^15.6.1",
    "react-router": "1.0.1",
    "webpack": "^3.5.6",
    "webpack-dev-server": "^2.7.1"
  },
  "scripts": {
    "webpack-dev-server": "NODE_ENV=development PORT=8080 webpack-dev-server --content-base public/ --hot --inline --devtool inline-source-map --history-api-fallback",
    "development": "cp views/index.html public/index.html && NODE_ENV=development webpack && npm run webpack-dev-server"
  },
  "author": "",
  "license": "ISC",
  "devDependencies": {
    "react-hot-loader": "^1.3.0"
  }
}

In this file, you'll notice that we've added the following:

  1. Babel to package our CommonJS modules and convert our ES6 and React JSX into browser-compatible JavaScript
  2. The Cosmic JS official Node.js client to easily serve our blog content from the Cosmic JS cloud-hosted content API
  3. Flux for app data management (which is a very important element in our React application).
  4. React for UI management on server and browser
  5. React Router for routes on server and browser
  6. webpack for bringing everything together into a bundle.js file.

We've also added a script in our package.json file. When we run npm run development, the script copies the index.html file from our views folder into our public folder. Then, it sets the content base for our webpack-dev-server to public/ and enables hot reloading (on .js file save). Finally, it helps us debug our components at the source and gives us a fallback for pages it can't find (falls back to index.html).

Now let's set up our webpack configuration file by editing the file webpack.config.js:

// webpack.config.js
var webpack = require('webpack')

module.exports = {
  devtool: 'eval',
  entry: './app-client.js',
  output: {
    path: __dirname + '/public/dist',
    filename: 'bundle.js',
    publicPath: '/dist/'
  },
  module: {
    loaders: [
      { test: /\.js$/, loaders: 'babel-loader', exclude: /node_modules/ },
      { test: /\.jsx$/, loaders: 'babel-loader', exclude: /node_modules/ }
    ]
  },
  plugins: [
    new webpack.DefinePlugin({
      'process.env.COSMIC_BUCKET': JSON.stringify(process.env.COSMIC_BUCKET),
      'process.env.COSMIC_READ_KEY': JSON.stringify(process.env.COSMIC_READ_KEY),
      'process.env.COSMIC_WRITE_KEY': JSON.stringify(process.env.COSMIC_WRITE_KEY)
    })
 ]
};

You'll notice that we've added an entry property with a value of app-client.js. This file serves as our app client entry point, meaning that from this point webpack will bundle our application and output it to /public/dist/bundle.js (as specified in the output property). We also use loaders to let Babel work its magic on our ES6 and JSX code. React Hot Loader is used for hot-loading (no page refresh!) during development.

Before we jump into React-related stuff, let's get the look-and-feel of our blog ready to go. Since I'd like you to focus more on functionality than style in this tutorial, here we'll use a pre-built front-end theme. I've chosen one from Start Bootstrap called Clean Blog. In your terminal run the following commands:

Create a folder called views and inside it an index.html file. Open the HTML file and add the following code:

<!DOCTYPE html>
<html lang="en">
<head>
  <meta charset="utf-8">
  <meta http-equiv="X-UA-Compatible" content="IE=edge">
  <meta name="viewport" content="width=device-width, initial-scale=1">
  <meta name="description" content="">
  <meta name="author" content="">
  <title>{{ site.title }}{{# page }} | {{ page.title }}{{/ page }}</title>
  <!-- Bootstrap Core CSS -->
  <link href="/css/bootstrap.min.css" rel="stylesheet">
  <!-- Custom CSS -->
  <link href="/css/clean-blog.min.css" rel="stylesheet">
  <link href="/css/cosmic-custom.css" rel="stylesheet">
  <!-- Custom Fonts -->
  <link href="//maxcdn.bootstrapcdn.com/font-awesome/4.1.0/css/font-awesome.min.css" rel="stylesheet" type="text/css">
  <link href="//fonts.googleapis.com/css?family=Lora:400,700,400italic,700italic" rel="stylesheet" type="text/css">
  <link href="//fonts.googleapis.com/css?family=Open+Sans:300italic,400italic,600italic,700italic,800italic,400,300,600,700,800" rel="stylesheet" type="text/css">
  <!-- HTML5 Shim and Respond.js IE8 support of HTML5 elements and media queries -->
  <!-- WARNING: Respond.js doesn't work if you view the page via file:// -->
  <!--[if lt IE 9]>
    <script src="https://oss.maxcdn.com/libs/html5shiv/3.7.0/html5shiv.js"></script>
    <script src="https://oss.maxcdn.com/libs/respond.js/1.4.2/respond.min.js"></script>
  <![endif]-->
</head>
<body class="hidden">
  <div id="app">{{{ reactMarkup }}}</div>
  <script src="/js/jquery.min.js"></script>
  <script src="/js/bootstrap.min.js"></script>
  <script src="/js/clean-blog.min.js"></script>
  <script src="/dist/bundle.js"></script>
</body>
</html>

To get all of the JS and CSS files included in public, you can get them from the GitHub repository. Click here to download the files.

Generally I would use the fantastic React Bootstrap package and refrain from using jQuery. However, for the sake of brevity, we'll keep the theme's pre-built jQuery functionality.

In our index.html file, we'll have our React mount point set up at the div where id="app". The template variable {{{ reactMarkup }}} will be converted into our server-rendered markup and then once the browser kicks in, our React application will take over and mount to the div with id="app". To improve the user experience while our JavaScript loads everything, we add class="hidden" to our body. Then, we remove this class once React has mounted. It might sound a bit complicated, but I'll show you how we'll do this in a minute.

At this point, your app should have the following structure:

package.json
public
  |-css
    |-bootstrap.min.css
    |-cosmic-custom.css
  |-js
    |-jquery.min.js
    |-bootstrap.min.js
    |-clean-blog.min.js
views
  |-index.html
webpack.config.js

Now that we have our static pieces done, let's start building some React Components.

Continue reading %Building a React Universal Blog App: A Step-by-Step Guide%

Building a React Universal Blog App: Implementing Flux

$
0
0

In the first part of this miniseries, we started digging into the world of React to see how we could use it, together with Node.js, to build a React Universal Blog App.

In this second and last part, we'll take our blog to the next level by learning how to add and edit content. We'll also get into the real meat of how to easily scale our React Universal Blog App using React organizational concepts and the Flux pattern.

Break It Down for Me

As we add more pages and content to our blog, our routes.js file will quickly become big. Since it's one of React's guiding principles to break things up into smaller, manageable pieces, let's separate our routes into different files.

Open your routes.js file and edit it so that it'll have the following code:

// routes.js
import React from 'react'
import { Route, IndexRoute } from 'react-router'

// Store
import AppStore from './stores/AppStore'

// Main component
import App from './components/App'

// Pages
import Blog from './components/Pages/Blog'
import Default from './components/Pages/Default'
import Work from './components/Pages/Work'
import NoMatch from './components/Pages/NoMatch'

export default (
  <Route path="/" data={AppStore.data} component={App}>
    <IndexRoute component={Blog}/>
    <Route path="about" component={Default}/>
    <Route path="contact" component={Default}/>
    <Route path="work" component={Work}/>
    <Route path="/work/:slug" component={Work}/>
    <Route path="/blog/:slug" component={Blog}/>
    <Route path="*" component={NoMatch}/>
  </Route>
)

We've added a few different pages to our blog and significantly reduced the size of our routes.js file by breaking the pages up into separate components. Moreover, note that we've added a Store by including AppStore, which is very important for the next steps in scaling out our React application.

The Store: the Single Source of Truth

In the Flux pattern, the Store is a very important piece, because it acts as the single source of truth for data management. This is a crucial concept in understanding how React development works, and one of the most touted benefits of React. The beauty of this discipline is that, at any given state of our app we can access the AppStore's data and know exactly what's going on within it. There are a few key things to keep in mind if you want to build a data-driven React application:

  1. We never manipulate the DOM directly.
  2. Our UI answers to data and data live in the store
  3. If we need to change out our UI, we can go to the store and the store will create the new data state of our app.
  4. New data is fed to higher-level components, then passed down to the lower-level components through props composing the new UI, based on the new data received.

With those four points, we basically have the foundation for a one-way data flow application. This also means that, at any state in our application, we can console.log(AppStore.data), and if we build our app correctly, we'll know exactly what we can expect to see. You'll experience how powerful this is for debugging as well.

Now let's create a store folder called stores. Inside it, create a file called AppStore.js with the following content:

// AppStore.js
import { EventEmitter } from 'events'
import _ from 'lodash'

export default _.extend({}, EventEmitter.prototype, {

  // Initial data
  data: {
    ready: false,
    globals: {},
    pages: [],
    item_num: 5
  },

  // Emit change event
  emitChange: function(){
    this.emit('change')
  },

  // Add change listener
  addChangeListener: function(callback){
    this.on('change', callback)
  },

  // Remove change listener
  removeChangeListener: function(callback) {
    this.removeListener('change', callback)
  }

})

You can see that we've attached an event emitter. This allows us to edit data in our store, then re-render our application using AppStore.emitChange(). This is a powerful tool that should only be used in certain places in our application. Otherwise, it can be hard to understand where AppStore data is being altered, which brings us to the next point…

React Components: Higher and Lower Level

Dan Abramov wrote a great post on the concept of smart and dumb components. The idea is to keep data-altering actions just in the higher-level (smart) components, while the lower-level (dumb) components take the data they're given through props and render UI based on that data. Any time there's an action performed on a lower-level component, that event is passed up through props to the higher-level components in order to be processed into an action. Then it redistributes the data (one-way data flow) back through the application.

Said that, let's start building some components. To do that, create a folder called components. Inside it, create a file called App.js with this content:

// App.js
import React, { Component } from 'react'

// Dispatcher
import AppDispatcher from '../dispatcher/AppDispatcher'

// Store
import AppStore from '../stores/AppStore'

// Components
import Nav from './Partials/Nav'
import Footer from './Partials/Footer'
import Loading from './Partials/Loading'

export default class App extends Component {

  // Add change listeners to stores
  componentDidMount(){
    AppStore.addChangeListener(this._onChange.bind(this))
  }

  // Remove change listeners from stores
  componentWillUnmount(){
    AppStore.removeChangeListener(this._onChange.bind(this))
  }

  _onChange(){
    this.setState(AppStore)
  }

  getStore(){
    AppDispatcher.dispatch({
      action: 'get-app-store'
    })
  }

  render(){

    const data = AppStore.data

    // Show loading for browser
    if(!data.ready){

      document.body.className = ''
      this.getStore()

      let style = {
        marginTop: 120
      }
      return (
        <div className="container text-center" style={ style }>
          <Loading />
        </div>
      )
    }

    // Server first
    const Routes = React.cloneElement(this.props.children, { data: data })

    return (
      <div>
        <Nav data={ data }/>
        { Routes }
        <Footer data={ data }/>
      </div>
    )
  }
}

In our App.js component, we've attached an event listener to our AppStore that will re-render the state when AppStore emits an onChange event. This re-rendered data will then be passed down as props to the child components. Also note that we've added a getStore method that will dispatch the get-app-store action to render our data on the client side. Once the data has been fetched from the Cosmic JS API, it will trigger an AppStore change that will include AppStore.data.ready set to true, remove the loading sign and render our content.

Page Components

To build the first page of our blog, create a Pages folder. Inside it, we'll create a file called Blog.js with the following code:

// Blog.js
import React, { Component } from 'react'
import _ from 'lodash'
import config from '../../config'

// Components
import Header from '../Partials/Header'
import BlogList from '../Partials/BlogList'
import BlogSingle from '../Partials/BlogSingle'

// Dispatcher
import AppDispatcher from '../../dispatcher/AppDispatcher'

export default class Blog extends Component {

  componentWillMount(){
    this.getPageData()
  }

  componentDidMount(){
    const data = this.props.data
    document.title = config.site.title + ' | ' + data.page.title
  }

  getPageData(){
    AppDispatcher.dispatch({
      action: 'get-page-data',
      page_slug: 'blog',
      post_slug: this.props.params.slug
    })
  }

  getMoreArticles(){
    AppDispatcher.dispatch({
      action: 'get-more-items'
    })
  }

  render(){

    const data = this.props.data
    const globals = data.globals
    const pages = data.pages
    let main_content

    if(!this.props.params.slug){

      main_content = &lt;BlogList getMoreArticles={ this.getMoreArticles } data={ data }/&gt;

    } else {

      const articles = data.articles

      // Get current page slug
      const slug = this.props.params.slug
      const articles_object = _.keyBy(articles, 'slug')
      const article = articles_object[slug]
      main_content = &lt;BlogSingle article={ article } /&gt;

    }

    return (
      <div>
        <Header data={ data }/>
        <div id="main-content" className="container">
          <div className="row">
            <div className="col-lg-8 col-lg-offset-2 col-md-10 col-md-offset-1">
            { main_content }
            </div>
          </div>
        </div>
      </div>
    )
  }
}

This page is going to serve as a template for our blog list page (home) and our single blog pages. Here we've added a method to our component that will get the page data prior to the component mounting using the React lifecycle componentWillMount method. Then, once the component has mounted at componentDidMount(), we'll add the page title to the <title> tag of the document.

Along with some of the rendering logic in this higher-level component, we've included the getMoreArticles method. This is a good example of a call to action that's stored in a higher-level component and made available to lower-level components through props.

Let's now get into our BlogList component to see how this works.

Create a new folder called Partials. Then, inside it, create a file called BlogList.js with the following content:

// BlogList.js
import React, { Component } from 'react'
import _ from 'lodash'
import { Link } from 'react-router'

export default class BlogList extends Component {

  scrollTop(){
    $('html, body').animate({
      scrollTop: $("#main-content").offset().top
    }, 500)
  }

  render(){

    let data = this.props.data
    let item_num = data.item_num
    let articles = data.articles

    let load_more
    let show_more_text = 'Show More Articles'

    if(data.loading){
      show_more_text = 'Loading...'
    }

    if(articles && item_num <= articles.length){
      load_more = (
        <div>
          <button className="btn btn-default center-block" onClick={ this.props.getMoreArticles.bind(this) }>
            { show_more_text }
          </button>
        </div>
      )
    }

    articles = _.take(articles, item_num)

    let articles_html = articles.map(( article ) => {
      let date_obj = new Date(article.created)
      let created = (date_obj.getMonth()+1) + '/' + date_obj.getDate() + '/' + date_obj.getFullYear()
      return (
        <div key={ 'key-' + article.slug }>
          <div className="post-preview">
            <h2 className="post-title pointer">
              <Link to={ '/blog/' + article.slug } onClick={ this.scrollTop }>{ article.title }</Link>
            </h2>
            <p className="post-meta">Posted by <a href="https://cosmicjs.com" target="_blank">Cosmic JS</a> on { created }</p>
          </div>
          <hr/>
        </div>
      )
    })

    return (
      <div>
        <div>{ articles_html }</div>
        { load_more }
      </div>
    )
  }
}

In our BlogList component, we've added an onClick event to our Show More Articles button. The latter executes the getMoreArticles method that was passed down as props from the higher-level page component. When that button is clicked, the event bubbles up to the Blog component and then triggers an action on the AppDispatcher. AppDispatcher acts as the middleman between our higher-level components and our AppStore.

For the sake of brevity, we're not going to build out all of the Page and Partial components in this tutorial, so please download the GitHub repo and add them from the components folder.

AppDispatcher

The AppDispatcher is the operator in our application that accepts information from the higher-level components and distributes actions to the store, which then re-renders our application data.

To continue this tutorial, create a folder named dispatcher. Inside it, create a file called AppDispatcher.js, containing the following code:

// AppDispatcher.js
import { Dispatcher } from 'flux'
import { getStore, getPageData, getMoreItems } from '../actions/actions'

const AppDispatcher = new Dispatcher()

// Register callback with AppDispatcher
AppDispatcher.register((payload) => {

  let action = payload.action

  switch(action) {

    case 'get-app-store':
      getStore()
      break

    case 'get-page-data':
      getPageData(payload.page_slug, payload.post_slug)
      break

    case 'get-more-items':
      getMoreItems()
      break

    default:
      return true

  }

  return true

})

export default AppDispatcher

We've introduced the Flux module into this file to build our dispatcher. Let's add our actions now.

Continue reading %Building a React Universal Blog App: Implementing Flux%

6 Pro Tips from React Developers

$
0
0

We've teamed up with Open SourceCraft to bring you 6 Pro Tips from React Developers.
Tip 1: Use functional components
Tip 2: Keep your components small
Tip 3: Understand how to handle this

Continue reading %6 Pro Tips from React Developers%

Viewing all 115 articles
Browse latest View live